You must be signed in to read the rest of this article.
Registration on CDEWorld is free. You may also login to CDEWorld with your DentalAegis.com account.
Patients now expect composite restorations to blend seamlessly with their natural dentition. Historically, the more esthetic a restoration was, the less strength it demonstrated. However, this is no longer the case, as strength and esthetics can both be achieved without compromise with new and improved materials, techniques, and processes.
The number one type of restoration dentists place are Class II posterior composites. Bicuspids and molar treatments account for more than 70% of all direct restorations placed.1 In this practice environment, clinicians need to be cognizant of restoration predictability and efficiency. While the goal is to deliver a higher level of care, clincians also want to be realistic, understanding that composites should be placed in an efficient manner for a practice to maintain probability. Creating natural-looking restorations can be incredibly time consuming and technique sensitive.
Technique Options
Many techniques work well: The goal is to select which one is best for the clinical situation. Traditionally, an incremental placement technique has been the standard for posterior universal composite placement. A flowable layer may be placed first, and then, increments of 2 mm or less in oblique angles. An incremental placement technique carefully places and cures multiple layers of composite to minimize shrinkage stress and ensure adequate depth of cure.2 Done properly, this can be time-consuming and not without complications. Decreasing the insertion and polymerization time can simplify this procedure, improve chairside efficiency, and increase profits.3
In a bulk-fill technique with a capping composite, an initial layer is applied and cured in 4 to 5 mm increments, and then, a layer of resin is placed on top. With a bulk-fill single viscosity technique, a single increment of resin is placed is able to be put into function. While bulk-fill composites are commonly used in dental practices today, layered restorations may be appropriate for anterior or maybe smaller to medium-sized posterior restorations for example.
A 2013 ADA study looked at a variety of single-increment bulk fills, and found them to all be acceptable according to international standards.4 Other third-party studies have demonstrates that bulk-fill composites may offer some of the best marginal seals in both cementum and enamel.5 Polymerization is the key: Bulk-fill composites work as long as the material is polymerized appropriately.
All composites shrink; the material and placement technique must account for the polymerization shrinkage stress on the bonded interface.6 Some brands demonstrate less shrinkage than others. Low shrinkage is especially useful for posterior areas, because layers can be placed without worrying about placing too much strain. When shrinkage is higher than 4%, this creates the potential for problems. In fact, horizontal layering can allow predictable placement of restorations with relative ease. In comparison to oblique or vertical layering, horizontal layering has shown very favorable bonds to the cavity floor.7
Composite Properties
The five main types of composites in the market today are macrofill, microfill, hybrid, nanofill, and a micro/nano hybrid. Most practices rely on hybrid composites and nanocomposites, but microfill and macrofill exist for more specialized usage.
The ideal composite has color stability, polishability, wear resistance, fracture toughness, and sculptability. Important features that distinguish composite types are optical and mechanical. Color, polish, translucency and the ability to blend in with neighboring teeth are essential optical factors. Strength, wear, depth of cure, and shrinkage are important mechanically. The value placed on each of these features depends on the location and quality of the teeth being restored.
Macrofills have been in the market the longest, exhibiting strength, but poor esthetics. In comparison, microfills provide better polishability, sculptability, and overall esthetics. However, they are weaker than macrofills, and as a result are often not strong enough to withstand compressive forces in the posterior. Microfills work well in a dual-layer technique in which the microfill is placed on the outermost surface, over a material with more strength.
The hybrid, nanofill, and micro/nano hybrid composites combined the strength of the macrofill and the preferred esthetics of the microfill.8 Conventional hybrids exhibit fracture toughness; however, they tend to be more difficult to sculpt and they do not polish as well. Nanohybrids became the next transition point in composite advances: stronger and more esthetic, with a positive sculptability, wear resistance, and color stability. However, the material lost some of its polishability related to microfill, and it can handle stiffly.
The ideal material would combine the esthetic benefits of a microfill with the functionality and handling capability of a nanohybrid, so it could be placed in both the anterior and the posterior when appropriate.
The Next Phase
While the optical and mechanical properties of a composite are important, so is how easily it can be handled. Handling ability is based on the filler percentage. Some newer composites include zirconium and silica particles in the filler: these elements with opposite charges are attracted to one another, allowing for a good fill and a decrease in viscosity while sculpting. Although the material is stiff in terms of staying in place, the kinetic energy from sculpting with an instrument allows for an easy blend into the margin. This type of composite material allows ease in creating the anatomical form so that it stays in place, while at the same time allowing it to adapt and change in viscosity when needed.
Viscosity is the propensity of a resin composite to be retained on an instrument while the material is being placed into the cavity preparation. There is an ideal, yet poorly defined level of stickiness whereby the resin composite will be retained in the cavity and not pulled out or deformed as the placement instrument is removed.9
Slump resistance is the ability of a resin composite to maintain its shape after placement and prior to curing. This is important in a clinical situation to sculpt the anatomy of a restoration in the unset paste prior to light curing, in part to reduce the amount of finishing required. This is particularly the case in Class III or Class V restorations, in large anterior restorations such as a direct composite veneer or a Class IV restoration, and when reconstructing the cuspal or crestal anatomy in posterior restorations (Class I and II).9
Tooth-colored Restorations Versus "White Fillings"
The goal of dental restorations is to mimic nature, as materials available today can not truly replicate it. In nature, enamel provides translucency, opalescence, and fluorescence. Dentin provides opacity, hue, and the level of intensity or the chroma. Dentin and enamel shades blended together provide a chameleon effect to the restoration. Esthetic resin composite restorations can be achieved, over a severely discolored tooth for example, if the layering technique using different combination shades is correctly applied.10 In order to build true color, both substrates, dentin and enamel, need to be considered.
Until recently, creating perfect composite restorations was a challenge due to many materials' limitations impacting shade integration, surface quality, or color stability. In addition to technological drawbacks, techniques involved a level of complexity and lacked predictability in clinical applications.
Shading and layering concepts are evolving from a simplistic, non histo-anatomical, bilaminar technique to a multi-layering approach.11 Recently, a simplified, shading system has been developed. It uses a reduced number of layers (often just dentin and enamel layers) and is known as the natural layering concept, aiming at optimal esthetic integration and natural color.11 In addition, adaptive response technology (ART)-a nanoparticle filler system that helps in achieving lifelike restorations-was developed to enable better blending capabilities and enhanced structural integrity, along with pleasing esthetics, for restorations.12The improved esthetics are achieved through the ART filler system by diffusing and reflecting light similar to the manner in which natural enamel does, thus helping it blend in with neighboring teeth.
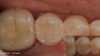
When selecting the composite shades for a case, the cervical one-third of a tooth's structure is examined to arrive at the right dentin shade. In this example, an adhesive was first placed and then cured. Next a 0.5-mm flowable layer of composite was placed and cured. Then an A3 dentin shade was placed at approximately a 1.5-mm depth and cured. Next an A2 enamel shade was placed on top. Simply two layers (three including the flowable layer), were used to create a well-blended restoration (Figure 1).
In some cases, there may be a need for dentin and enamel replacement in some areas and only enamel replacement in others. In this case, a 0.5 mm layer of flowable composite was placed first. The A2 dentin was used in any area where dentin was removed, and A2 enamel was placed over the top. All areas were lined with an A2 flowable. The area was etched as needed, adhesive was applied, and flowable composite was placed in 0.5 mm layer. In the central groove and the buccal standpoint, primarily enamel replacement was needed. Therefore only an A2 enamel shade was placed there. In the distal box, both dentin and enamel shades were placed, resulting in a reasonable result that blended in with the dentition (Figure 2).
One of the most important steps in successfully creating bonded restorations is contouring, finishing, and polishing. Proper finishing and polishing greatly increase esthetic results, maximize patients' oral health, and increase the longevity of restorations.13,14 When it comes to these steps, one technique is to start with multi-fluted carbide burs (which are used to remove material and tooth structure).15 Using a fine diamond bur, gross contouring can be accomplished, and often some of the initial finishing and polishing. Then contour as needed is accomplished with the disk to create macro-anatomy.12 For polishing, a slightly moist rubber cup or point at about 5000-7000 RPMs is selected.16 This is the final step and many polishes on the market will work satisfactorily.
Another critical factor of restoration success is adhesion: Resin and adhesion should be thought of synergistically. Etching enamel seems to secure a better bond: Research has shown that etching enamel significantly increases the shear bond strength of composite enamel.17,18 However, research results recommend not etching dentin.19,20 Universal adhesives today are better as a one-bottle solution, although they are lacking in long-term data. It is important to ensure that the adhesive is compatible with any cementation used.
Conclusion
The lack of any substantial shift in products is a testament to the success of resin composites as restorative dental filling materials. Ever since the introduction of light-curable resin-based composites, these materials have continually evolved to meet the increasing requirements of dental practitioners and patients, with material design that involves particle dispersion within a resin matrix.21 In order to attain restorations that mimic nature, with long-term success, periodically reviewing updates in techniques and materials is essential.
References
1. Class II resins: nanofill brands as group show best performance yet, simplifying your class ii composite finishing technique, the cracked tooth: endo, extract, or restore? Clinicians Report. 2014;7(4).
2. Cheung GS. Reducing marginal leakage of posterior composite resin restorations: A review of clinical techniques. J Prosthet Dent. 1990;63(3):286-288.
3.Bassett J. To bulk fill or not to bulk fill… that is the question. Dental Economics. August 26, 2015. http://www.dentaleconomics.com/articles/print/volume-105/issue-8/science-tech/to-bulk-fill-or-not-to-bulk-fill-that-is-the-question.html. Accessed December 5, 2017.
4. Tiba A, Zeller GG, Estrich CG, Hong A. A laboratory evaluation of bulk fill versus traditional multi-increment-fill resin-based composites. ADA Professional Product Review. 2013;8(3):13-26.
5. Al-Harbi F, Kaisarly D, Bader D, El Gezawi M. Marginal integrity of bulk versus incremental fill class ii composite restorations. Oper Dent. 2016;41(2):146-156.
6. Tiba A, Zeller GG, Estrich CG, Hong A. A laboratory evaluation of bulk-fill versus traditional multi-increment-fill resin-based composites. J Am Dent Assoc. 2013;144(10):1182-1183.
7. Nikolaenko SA, Lohbauer U, Roggendorf M, et al.Influence of c-factor and layering technique on microtensile bond strength to dentin. Dent Mater. 2004;20(6):579-585.
8. Lavigne C. Dental composites in 2017: types and recommendations. Spear Education web site. January 18, 2017. http://www.speareducation.com/spear-review/2017/01/dental-composites-in-2017-what-to-look-for-and-what-to-get. Accessed December 5, 2017.
9.Ferracane JL, Hilton TJ, Stansbury JW, et al. Academy of Dental Materials guidance - Resin composites: Part II - Technique sensitivity (handling, polymerization, dimensional changes). Dent Mater. 2017;33(11):1171-1191.
10. Miotti LL, Santos IS, Nicoloso GF, et al. The use of resin composite layering technique to mask discolored background: A CIELAB/CIEDE2000 Analysis. Oper Dent. 2017;42(2): 165-174.
11. Dietschi D, Fahl N Jr. Shading concepts and layering techniques to master direct anterior composite restorations: an update. Br Dent J. 2016;221(12):765-771.
12. Cordy M. Kerr Harmonize Composite. Global Tec Enterprise Inc web site. https://global-tecinc.com/kerr-harmonize-composite/. Accessed December 5, 2017.
13. Jefferies SR. Abrasive finishing and polishing in restorative dentistry: a state-of-the-art review. Dent Clin North Am2007;51(2):379-397.
14.Turkün LS, Turkün M. The effect of one-step polishing system on the surface roughness of three esthetic resin composite materials. Oper Dent.2004;29(2):203-211.
15. Radlanski RJ. A new carbide finishing bur for bracket debonding. J Orofac Orthop. 2001 62(4):296-304.
16. Hodges K, ed. Concepts in Nonsurgical Periodontal Therapy. New York, NY: Delmar; 1998:345-366.
17. Siqueira F, Cardenas AM, Gutierrez MF, et al. Laboratory performance of universal adhesive systems for luting CAD/CAM restorative materials. J Adhes Dent. 2016;18(4):331-340.
18.McLean DE, Meyers EJ, Guillory VL, Vandewalle KS. Enamel bond strength of new universal adhesive bonding agents. Oper Dent. 2015;40(4):410-417.
19. Thanaratikul B1, Santiwong B, Harnirattisai C. Self-etch or etch-and-rinse mode did not affect the microshear bond strength of a universal adhesive to primary dentin. Dent Mater J. 2016;35(2):174-179.
20. Wagner A, Wendler M, Petschelt A, et al. Bonding performance of universal adhesives in different etching modes. J Dent. 2014;42(7):800-807.
21. Randolph LD, Palin WM, Leprince JG. Composition of dental resin-based composites for direct restorations. In: Dental Composite Materials for Direct Restorations. Cham, Switzerland:Springer; 2018:11-24.