You must be signed in to read the rest of this article.
Registration on CDEWorld is free. You may also login to CDEWorld with your DentalAegis.com account.
Direct resin restorations have historically challenged clinicians in terms of ensuring esthetic predictability, strength, durability, and wear rates, among other factors. The additional factors related to composite resins that have limited the success of the direct restorations created with this material include shrinkage, microleakage, recurrent decay, and sensitivity.1 More realistically, however, these difficulties that dentists experience with today’s composites reflect a combination of shortcomings with both material formulations and the use of techniques that are inappropriate for the clinical situation at hand.1,2
For example, shrinkage in composite is caused by the change in dimension of the composite as the resin cures. The molecules come together to form bonds with each other and, therefore, the lower the proportion of resin (higher proportion of filler or higher loading) in a composite, the lower the shrinkage will be. Composites that are supposed to have low shrinkage typically contain large-particle fillers in order to achieve a high loading. However, they usually demonstrate poor polishability and do not retain their luster during clinical use.2,3
It is also understood that shrinkage and shrinkage stress in composite resin restorations result in inadequate adhesion to the cavity walls.4 For this reason, careful clinical application is required, particularly the use of incremental layering techniques that have been shown to compensate for polymerization shrinkage.3 In fact, incremental filling techniques also help to ensure a thorough depth of cure of the composite resin.5 Further, the overall layering, contouring, and polishing principles are important to the success of the direct composite restorations,6 particularly for helping to seal the restoration and maintain natural surface luster.7
Yet, polymerization shrinkage itself is not necessarily a significant problem. Rather, the adverse consequences from polymerization shrinkage—such as fracture of the remaining tooth structure and marginal leakage—can contribute to failure of the posterior composite resin restoration.8 The sequelae of these negative consequences also include staining, recurrent caries, postoperative sensitivity.8
While a change in the size of fillers and filler content has reduced the level of shrinkage of today’s composites and also enhanced other composite characteristics—such as modulus of elasticity, coefficient of thermal expansion, and flexural/compressive strength—this change also has improved the wear and polishability of composites.2,3 For example, in microhybrid composites, the filler size (approximately 0.4 to 1.0 um average) dictates a certain wear characteristic that, while acceptable, has offered room for improvement. During the life of a hybrid composite, inorganic filler particles become detached from the resin matrix due to wear or plucking. Over time, this effect results in loss of luster and causes the composite restorative to look dull, or even frosty.
Fillers are the components of composite restorative materials that most affect their properties. The smaller the filler size and the larger the filler content, the better the polishability and greater the wear resistance.2,3
In fact, manufacturers have continuously reduced the size of the particles used in direct composite materials since the first introduction of this restorative modality.3 For example, microfill resins were developed that are generally resistant to wear in conservative restorations.9 Most recently, nanofilled composite resins were introduced to answer clinician demands for a universal restorative material that can be used for all types of direct restorations, even those in the posterior dentition. In particular, nanofilled composites demonstrate the appropriate resistance necessary for high stress-bearing areas such as the posterior segment.2
Characteristics of nanofilled composites include smaller particle sizes, low wear rates, and long-lasting luster and surface anatomy.2,10 As a result, the direct composites available today represent significant improvements over what was previously offered, enabling clinicians to provide patients with highly esthetic, durable, and functional restorations. These improvements allow continued use of techniques that, although they must be precisely followed, result in predictable, conservative, and reliable restorations.11
Based on the development of sound clinical protocol and advanced restorative materials, composite resins continue to be used increasingly for the restoration of posterior teeth.12 When such procedures are performed properly, the likelihood for achieving a predictable posterior restoration is enhanced.
This article focuses on the use of a small-particle resin composite for the restoration of two posterior interproximal carious lesions. The clinical advantages of the material will be discussed, as well as the detailed protocol used to incrementally place the composite to ensure clinical success.
Case Presentation
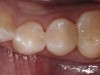
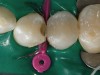
A female patient in her early 20s presented for a regular dental check-up. During the hygiene phase of the appointment, interproximal caries between the mesial and distal areas of her premolars was observed (Figure 1). Based on the depth of the interproximal caries beyond the enamel surface and the inability to remineralize the cavitated tooth structure, the decision was made to place direct composite resin restorations.
Among the direct composite alternatives available today is a “trimodal composite” (Premise™, Kerr Corporation, Orange, CA) that combines a prepolymerized filler, patented Point 4 filler, and 0.02 micron filler. It was decided that this composite would be used for this case. Combined, these filler particles work together to produce restorations with enhanced polishability, durability and strength.13,14
Premise contains a high filler load that reduces polymerization shrinkage.8 Additionally, Premise demonstrates higher compressive strength, along with increased durability.13 This provided the author with confidence that the posterior restorations would last for the long-term.
Preparation Protocol
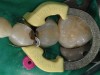
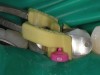
The patient first was anesthetized and a rubber dam placed for good isolation and to insure decontamination of the working field, keeping the area clean and dry (Figure 2). Prior to initiating any tooth preparation, a V3-Ring (TrioDent, Katikati, New Zealand) was placed in order form a separation between the affected teeth (Figure 3). This separation would compensate for the space required for the matrix bands.
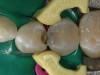
Given the fact that the patient presented with decay, it was important to determine which preparation and restorative protocol would be followed based on her condition in order to first remove the caries and second, restore the dentition (Figures 4). In this case, the patient presented with moderately small caries. Therefore, in terms of developing the occlusion and anatomy, there wasn’t much to consider. Further, because the affected areas were small, direct composite restorations—which inherently only require minimal tooth preparation—were ideal and indicated.
Adhesive Protocol
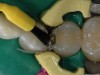
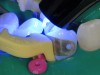
Matrices were inserted two at a time (Figure 5), as opposed to placing them one at a time, because the first matrix could be too wide, thus invading the space of the second. That would require an adjustment, so it is therefore considered ideal to place the two matrices at the same time to ensure that they are the exact size and shape required. Therefore, note that precontour bands that require little or no adjustment are desirable so that the matrix can provide axial confinement of the resin and convexity to the proximal surface of the restoration.3
The ring was placed back and a wedge was then carefully placed in order to close the gingival embrasure, while the ring was intended to produce the space required to compensate for and close the band on the proximal side. Pre-wedging the tooth protects the interseptal dam and gingival tissue; if used during preparation protocol, it prevents injury and helps to rapidly separate the teeth for placement of the matrix band.3 This enables easier realization of appropriate contact with the adjacent dentition once the matrix is removed and the resin is placed.3
A three-step etch, primer, and adhesive protocol was followed. The preparations were first etched (Figure 6). Then, a primer was applied to the preparations (Figure 7 and Figure 8), after which a fourth-generation, total-etch, three-step, adhesive (Optibond FL, Kerr) was applied and light-cured (Figure 9).
Incremental Build-Up
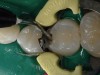
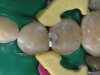
A thin layer of a flowable composite was applied to the preparation floor and light-cured as directed (Figure 10). Flowable composites are easily adapted to small cavity preparations. Then, increments of Premise were applied, sculpted, and cured (Figure 11).
Once the first restoration was completed (Figure 12), the matrix band corresponding to the first pre-molar was removed (Figure 13) and the second restoration was built-up in a manner similar to the first. The ring, band, and matrices were repositioned, and the flowable composite and nanocomposite were placed and cured incrementally (Figure 14 and Figure 15).
Finishing & Polishing
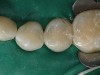
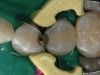
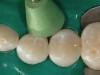
Following completion of both posterior restorations, the ring, band, and matrices were removed (Figure 16). Any flash in the interproximal and/or cervical areas were removed using a #12 blade and floss.
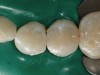
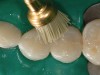
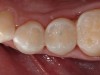
Finishing and polishing followed a specific protocol.3,6,7 The final contour and initial polishing was completed using a Jiffy green cup (Ultradent Products, Inc, South Jordan, UT) (Figure 17). A Jiffy brush (Ultradent Products, Inc.) was used to facilitate polishing in between the spaces of the teeth, as well as over the surface anatomy developed when creating the restorations (Figure 18). Once the occlusion had been verified (Figure 19), the rubber dam was removed and the occlusion verified (Figure 20).
Conclusion
The recent advancements in composite formulations have helped to alleviate some of the concerns clinicians have regarding shrinkage, filler size, and their effects on the predictability, durability, strength, and esthetics of posterior composite restorations.10 One such innovative composite material—Premise—offers clinical advantages such as smoother, more consistent handling properties, long-lasting esthetics, high sculptability, and reduced shrinkage.8,13,14 The compositional changes of such materials impart characteristics that enable easier polishability and handling, as well as strength and durability, thereby allowing dentists to create long-lasting restorations with enhanced physical properties.
This specific case presentation demonstrates the ease-of-use of this small-particle composite for placing two adjacent interproximal posterior composites. In just one visit, successful direct posterior composite resin restorations are clinically possible as a result of the many technological advancements made within the dental industry.
References
1. Terry DA. Restoring the interproximal zone using the proximal adaptation technique--Part 2. Compend Contin Educ Dent. 2005;26:11-12,15-16,18.
2. Lopes GC, Oliveira GMS. Direct composite resin restorations in posterior teeth. Compend Contin Educ Dent. 2006;27(10):572-580.
3. Fortin D, Vargas MA. The spectrum of composites: new techniques and materials. J Am Dent Assoc. 2000;131:26S-30S.
4. Cheung GS. Reducing marginal leakage of posterior composite resin restorations: a review of clinical techniques. J Prosthet Dent. 1990 Mar; 63(3):286-8.
5. Wilson EG, Mandradjieff M, Brindock T. Controversies in posterior composite resin restorations. Dent Clin North Am. 1990 Jan;34(1):27-44.
6. Peyton JH. Direct restoration of anterior teeth: review of the clinical technique and case presentation. Pract Proced Aesthet Dent. 2002;14(3):203-210.
7. Peyton JH. Finishing and polishing techniques: direct composite resin restorations. Pract Proced Aesthet Dent. 2004;16(4):293-298.
8. Hilton T, Ferracane, J. Evaluation of a prototype low shrinkage composite. Part 1: Comparison of the shrinkage stress of the prototype composite to other composites. Part 2: Evaluation of the microleakage of the prototype composite to other composites. Data on file. Kerr Dental Products. 2005.
9. Mazer RB, Leinfelder KF. Evaluating a microfill posterior composite resin. A five-year study. J Am Dent Assoc. 1992 Apr; 123(4):32-38.
10. Yesil ZD, Alapati S, Johnston W, et al. Evaluation of the wear resistance of new nanocomposite resin restorative materials. J Prosthet Dent. 2008;99(6):435-443.
11. Vargas H. Conservative aesthetic enhancement of the anterior dentition using a predictable direct resin protocol. Pract Proced Aesthet Dent. 2006;18(8):501-507.
12. Baratieri LN, Ritter AV, Perdigao J, Fillippe LA. Direct posterior composite resin restorations: current concepts for the technique. Pract Periodontics Aesthet Dent. 1998 Sep; 10(7):875-886.
13. Thompson J. Laboratory Research Report: Mechanical Behavior of Premise. Kerr Dental Products. 2004.
14. Clelland NL, Pagnotto MP, Kerby RE, et al. Relative wear of flowable and highly filled composite. J Prosthet Dent. 2005;93:153-157.
About the Author
Marcos Vargas, DDS, BDS, MS
Department of Family Dentistry,
University of Iowa
Iowa City, Iowa