You must be signed in to read the rest of this article.
Registration on CDEWorld is free. You may also login to CDEWorld with your DentalAegis.com account.
Introduction
Although composite resins possessing the same basic organic matrix as many of the popular composites that are in use today were introduced by Bowen in the 1950s, the author recollects that Fairleigh Dickinson University School of Dentistry first introduced composite resins into its curriculum in 1973. Composite resins were designed to replace the tooth-colored silicate cements, which had been used to restore caries in anterior teeth. These composite systems were supplied in two jars. One jar contained a base and the other a catalyst. The two pastes were thoroughly mixed together and placed into the cavity preparation. Within minutes, they polymerized and the tooth-colored restoration was ready for final shaping and polishing. Tooth whitening had not been invented yet, so the only shade of composite available was similar to Vita A-3.
Students in the author’s class were taught that dental amalgam was the restoration of choice for posterior caries. It was inexpensive and very easy to use. Most patients did not complain about the grey color of the material and no one seemed to care if the restorations contained mercury.
In the private practice of dentistry, patients requested tooth-colored restorations for their posterior teeth and dentists began to experiment with posterior composite restorations using the new two-paste composite system. Some dentists began to use the composite to restore simple occlusal caries in posterior teeth. These initial restorations were placed using first-generation bonding systems that had been designed for Class 3 restorations. The restorations were placed at a time when clinicians were only etching the enamel and were using calcium hydroxide to base out the restoration. The results were unpredictable at best.1 Some teeth became very sensitive and the composite restorations had to be replaced with dental amalgam. In restorations that did not become sensitive, marginal breakdown of the composite, along with ditching and recurrent decay, became a common sight. Clearly, the use of composite for posterior restorations would need some advances in materials and placement technique if it were to become a viable, long-term restorative material.
In the ensuing years, many dentists have discontinued use of dental amalgam in their practices. Dentists have used a number of white restorative materials for posterior teeth with varying degrees of success. Many dentists have used milled ceramic restorations to repair caries on posterior teeth. These restorations have been highly predictable and long lasting as well as very esthetic. Milled restorations present no problem with shrinkage, and the margin strength is very good.2 Other than the increased cost to the patient, dentists have been quite pleased with the results using tooth-colored, milled restorative materials.
Recent developments in the field of composite resin chemistry have helped dentists to feel more confident in selecting contemporary composite resins for the restoration of posterior teeth. The current generation of composite resin restorations promises to be long lasting and free from sensitivity.
Brief History of Resin-Based Composites
Two-Paste System, First-Generation Composites
Resin-based dental composites first made their appearance in the 1960s. The first generation of dental adhesives were based on enamel etching and use of the “smear layer” to achieve dentin bonding.3 These early two paste composite systems were designed for Class 3 restorations where marginal stress would be minimal. When used for posterior restorations, tooth sensitivity, restoration fracture, and margin breakdown were common occurrences.
Microfill Composites
During the early 1970s, microfill resin-based composites made their debut.4 The microfills were a significant advance from the two-paste system. They were supplied as a single-paste system and were cured using a photopolymerization process. The microfill composites contained finely ground silica particles to improve the polishability of anterior resin-based composite restorations.5 Placement techniques for the restoration of posterior teeth included the bulk-fill technique borrowed from dental amalgam placement. Again, tooth sensitivity, bulk fracture, and marginal issues plagued this generation of resin-based composite materials. Microfill composites used in posterior teeth showed very little resistance to wear.
Hybrid Composites
By the late 1970s, hybrid composites were beginning to become available. These resin-based composites had both the small particles of the microfill composites, and larger particles, which greatly increased the density of the material. These materials were easy to polish and were highly resistant to fracture and wear.6 Photopolymerization stress caused marginal breakdown and recurrent decay along with sensitivity during chewing. During this time, dentists were still not encouraged to use a “total-etch technique,” but everyone had stopped using calcium hydroxide under composites, except in situations of vital pulp exposure.7
Microhybrid Composites
Microhybrid composites began appearing in the 1980s. This new generation of composites addressed many of the problems associated with the first generations of resin-based composites. Microhybrids are stronger, more resistant to fracture, easy to polish, show great resistance to wear, have greater margin strength, and mimic natural enamel to a high degree.6 While the hybrid composites have filler particle sizes of 1 µm to 3 µm, the microhybrids have filler particle sizes that average 0.4 µm. This smaller particle size provides a composite that can be highly polished.8 The microhybrids also have been developed in dentin colors as well as translucent enamel shades to allow the dentist to accurately reproduce the nuances of dental enamel.3 The problems of photopolymerization shrinkage continue to be problematic for resin-based composites used on posterior teeth.9 Many dentists began to use an incremental placement of the composite technique to help ease photopolymerization stress. This technique was not 100% effective, but it allowed the placement of many more posterior composite restorations. During this time period, many manufacturers offered prepolymerized pieces of bis-GMA composite material that could be incorporated into unpolymerized composite resin in an attempt to minimize the photopolymerization shrinkage effect. The total-etch technique is now the standard of care for the preparation and placement of resin-based composite restorations.10
Nanohybrids
The most recent generation of resin-based composites are the nanohybrids. Nanohybrids may be the first truly universal, direct placement restorative material.11 Their resistance to fracture and wear, along with their high margin strength, make them ideal for placement in posterior teeth.12 The wide selection of dentin colors, translucent enamel colors, and their polishability make them equally suitable for anterior restorations.13 Nanohybrids contain silica nanoparticles averaging 20 nm to 50 nm in size, promoting increased polishability and decreased shrinkage. The addition of barium-glass filler particles 0.4 µm in size add to the polishability and strength. Prepolymerized fillers are added to optimize the handling characteristics of the composite and to reduce the shrinkage seen during photopolymerization. The use of a flowable base, such as a glass-ionomer cement, along with incremental addition of restorative material has made this generation of composite easy to place and predictably not sensitive to temperature and chewing forces.
The Chemistry of Conventional Posterior Composites
The chemistry of classic resin-based composite restorative materials is the bis-GMA monomer. This monomer resembles an epoxy resin except for the replacement of the epoxy groups by methacrylate groups. The shortcoming of this composite is the shrinkage that occurs during photopolymerization.14 In the typical composite, this shrinkage is estimated at about 3% to 4%.15 This may seem small, but it has been the cause of many headaches for dentists since the introduction of composites to restore posterior teeth. The shrinkage of composite restorative materials, especially in Class 1 cavity preparations, has been the cause of hot and cold discomfort and chewing sensitivity, and has resulted in numerous root canal treatments.16
The general shape of the bis-GMA resin molecules is linear in nature. The photopolymerization process causes these molecules to link up. The linking process causes a decrease in volume of the resulting polymerized resin.17 As the resin shrinks, it is pulled away from the prepared cavity walls and floor. This pulling away leaves a small amount of space that may trap pulpal fluids. Upon mastication or temperature change this fluid moves in the dentinal tubules, causing hydrodynamic pressure changes in the pulp chamber. This pressure change is thought to be the source of the discomfort or pain experienced by some patients after composite placement in posterior teeth.18 Bulk-filling composite in posterior teeth increases the amount of shrinkage and almost ensures posttreatment sensitivity.
The Chemistry of Low-Shrinkage Composites
New to the posterior resin-based composite systems is the silorane monomer category. Silorane chemistry does not contain the linear methacrylate molecules. The chemistry has combined the siloxanes and oxiranes into a new monomer that is very biocompatible and exhibits very low shrinkage. The photopolymerization process involves an opening of the ring structure of the molecules that significantly reduces the polymerization shrinkage noted with bis-GMA resins.19 The opening of the ring structure counteracts the loss in volume that would result from the expected shrinkage. The silorane monomer composites shrink less than 1% on photopolymerization.20
The silorane monomer composites require a specialized two-step self-etch primer and adhesive system. Wear and polishability are similar to the latest nanohybrids available today, because of the inclusion of various fillers and particles to enhance the polymerized composite.21
Also new to posterior resin-based composite systems are the urethane dimethacrylate monomers. The chemistry of these composites is compatible with conventional bonding systems. The stereochemistry of the urethane dimethacrylate molecule is that of a rigid long core which prevents monomer deformation and reduces polymerization shrinkage. Volumetric shrinkage values are reported at less than 1.5%.10
These composites are a clear break with the bis-GMA chemistry dentistry has so long relied on for direct-placement composite restorations. Other new resin-monomer chemistry is surely on the horizon. It remains to be seen how quickly these new chemistries will become the mainstream of dentistry, or if they will disappear as newer technologies develop.
Posterior Composite Restorations are Technique-Sensitive
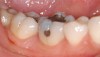
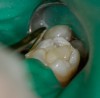
Contemporary resin-based composites have addressed the many problems they have experienced since their introduction. Fillers have made them stronger, more resistant to wear, and increased their polishability. Fillers have also reduced the stress induced during photopolymerization.22 Although shrinkage on photopolymerization has been decreased, it still remains a significant problem with Class 1 restorations on posterior teeth23 (Figure 1).
An important part of sensitivity in posterior teeth restored with direct composite restorations is the configuration factor, also known as the C-factor, of the cavity preparation. Simply described, a Class 1 posterior restoration has a C-factor of 5.
The cavity preparation has mesial, distal, facial, and lingual walls along with a cavity floor, for five surfaces in contact with the restoration. Upon curing, the shrinkage of the composite pulls on all five walls of the cavity preparation. This shrinkage produces microspaces under and around the restoration allowing micromovement of the restoration and the pulpal fluids. The micromovement is the cause of the discomfort described by many patients after Class 1 composite placement.24 Teeth with a lower c-factor, such as a Class 2 preparation with a c-factor of 3, allow the composite to “flow” on shrinkage and reduce the stress on the restoration and the surrounding tooth structure.
The standard of care for placement of posterior composites begins with rubber dam placement. Rubber dam isolation prevents contamination from oral fluids and the moist air of the oral cavity.25 Cavity preparation can begin by using appropriate-sized burs to accomplish caries removal. Minimally invasive dentistry cavity preparation techniques should be used at all times to conserve healthy tooth structure. The classic GV Black cavity preparation for retaining dental amalgam restorations is far too aggressive for modern adhesive dentistry.26
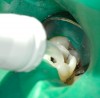
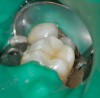
When all caries has been removed, the cavity preparation should be rinsed with the air/water syringe for 10 seconds and dried. Using a 32% to 37% phosphoric acid gel, the dentin portions of the cavity preparation should be etched for no more than 5 seconds to “cleanse” the surface of the dentin. An air/water syringe is used for 15 seconds to neutralize and remove any remaining etch material.27 The exposed dentin areas of the preparation are then carefully moistened using a cavity desensitizer such as Gluma® (Heraeus Kulzer) a formula of 5% glutaraldehyde and 35% HEMA (hydroxylethyl methacrylate) in water. The Gluma is placed using a small, disposable, flocked tip applicator.28 The dentin is left slightly moist, and is then based out using glass-ionomer cement (Figure 2). Glass-ionomer cement has superior biocompatibility. Glass ionomer has a similar coefficient of thermal expansion to dentin and it supplies fluoride to help remineralize any surrounding tooth structure it may contact. Glass-ionomer cements remain dimensionally unchanged during their polymerization process and, therefore, do not place any stress on the fluids of the dentinal tubules.29
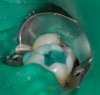
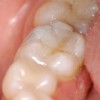
After the glass-ionomer cement has finished its set, usually about 3 minutes, the cavity preparation can be refined and is ready for final etch. For final etch, the phosphoric acid gel is placed on the prepared enamel margins, or if the clinician prefers, a total-etch technique can be used for 15 seconds and then rinsed away for 15 seconds with an air/water syringe (Figure 3).
Adhesive is placed on the prepared enamel using a small, disposable, flocked tip applicator. Continue scrubbing it into the etched enamel in three successive applications. The high-velocity suction is used to pull off the solvent, leaving the adhesive on the surface of the prepared enamel. The adhesive is light-cured and the cavity preparation is now ready for placement of the composite restorative material.30
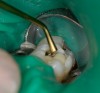
The build-up of the composite is begun using a dentin shade (eg, Kerr Herculite Ultra Enamel A-3, Nanohybrid Composite Restorative; Tetric EvoCeram A-3, Ivoclar Vivadent; or Filtek™ Supreme Plus A-3, 3M ESPE). This allows the operator to build shade for the final restoration from inside the tooth. The material is easy to manipulate and is thixotropic. The composite is shaped like the actual dentin layer it is replacing (Figure 4). This layering of the dentin composite is much like the way a ceramist would build up layers of porcelain for a stacked ceramic crown. The concept is to develop the dentin morphology, as it would exist under the natural tooth enamel.11 This building of the dentin layer allows the operator to mimic natural tooth anatomy and have color come from within the tooth for greater depth. In earlier types of composite, the color appeared to be very opaque and mostly a surface coloration. Surface-colored composites appear less natural. When the operator has completed the shaping of the dentin layer, the composite is then photopolymerized.
If the other teeth in the arch have occlusal pit-and-fissure stains, these stains can easily be duplicated using Kerr Kolor+Plus, Optident Enamel Plus HFO stain kit, or Coltene Whaledent Paint on Color. In this case, using the tip of an explorer, Kerr Kolor+Plus Ochre was placed on to the dentin shade composite and pulled to resemble a pit-and-fissure stain. The stain was then photopolymerized.
The final step of composite placement is using a translucent enamel shade (eg, Kerr Herculite Ultra Light Incisal Nanohybrid Composite Restorative; Ivoclar Vivadent’s Tetric EvoCeram, or 3M ESPE’s Supreme Plus) (Figure 5). This translucent enamel shade allows the color that has been built from within the tooth to add warm color to the restored tooth without looking like the restoration has been “painted” onto the surface of the tooth.
The enamel layer is shaped using composite hand instruments and is photopolymerized (Figure 6). The occlusion may now be checked using a marking paper and adjusted using smooth diamonds and multifluted carbide burs. After the occlusion has been adjusted and no interferences remain, the final restoration may be polished (Figure 7).
Flowable Base Possibilities for Posterior Composites
The use of a flowable base to relieve the internal stress generated during the curing process has been effective at eliminating posttreatment sensitivity of posterior composite restorations. The most common flowable base used under photopolymerized composite resins is glass-ionomer cement.19 This material is very biocompatible and is easy to use. The material is best placed in a small disposable syringe and introduced into the floor of the prepared cavity. It can be very easily shaped using a condenser to provide a level floor for the composite restoration. An alternative technique is to almost fill the cavity preparation with glass-ionomer cement and then use a high-speed rotary instrument to reshape the cavity preparation.31 The cement is light-cured and is ready for the incremental layering technique of the composite resin.
As it polymerizes, glass-ionomer cement develops a chemical adhesion to dentin. The glass-ionomer cement seals the open dentin tubules and prevents the hydrodynamic pressure that is the source of tooth sensitivity following composite placement.
Conventional bis-GMA flowable composites have been used for many years to base out deep portions of large composite restorations. Filtek Supreme Plus Flow, 3M-ESPE; FlowTEC, Benco Dental; Heliomolar Flow, Ivoclar and Unifil Flow, GC America are flowable composites that may be used as flowable liners under large composite restorations.
The Kerr Corporation also has a flowable composite that can be used as a base under conventional composite or be used to bulk fill and then become the final restoration. Vertise Flow is a self-etching, self-adhering, light-cured flowable composite. The tooth is prepared as usual, and is rinsed and dried. The composite is introduced into the cavity preparation at its deepest part. Then, using the provided Bond Activating Brush for optimal adhesion, the composite is brushed with moderate pressure for 15 to 20 seconds onto the entire surface of the prepared tooth right up to the cavosurface margin. The composite is thinned through brushing to approximately 0.5 mm. If being used as a flowable liner, it is then photopolymerized and then the tooth may be restored using the conventional layering technique. This composite is totally unique in its chemistry and its use and adaptation to the cavity preparation.
Because the composite is self-etching and self-adhering, it almost seems too easy to use. Upon completion of the cavity preparation, simply begin to place the restorative material into the cavity preparation. Except for a sealant restoration, where etching is indicated, there is no need to etch, rinse, place adhesive, etc. This is a great way to restore posterior teeth with direct-placement composite restorative material.
Curing Light (Photopolymerization) Induced Stress
The bis-GMA resin composite restorative materials are easy to place, manipulate, and finish. They are extremely biocompatible and they mimic the properties and esthetics of natural tooth enamel. The major disadvantage of this otherwise ideal restorative is the stress induced into the restoration upon photopolymerization.19 Bulk-filling cavity preparations with uncured bis-GMA composite restorative materials results in even greater photopolymerization-induced stress resulting from the volumetric shrinkage, reaction kinetics, and viscoelastic properties of the composite resin.32
Various techniques of photopolymerization have been evaluated to reduce the quantity of stress induced during the curing process. There have been a number of “soft start” protocols, pulse protocols, and the conventional full-intensity cure technique. These studies have shown that certain “soft start” and pulse protocols may reduce the final stress of the restoration by producing a modest decrease in final conversion of the composite.9
Managing the shrinkage/stress factor through a modified composite resin placement technique began as a result of the sensitivity noted in restorations placed with the bulk-fill technique. Many types of composite layering techniques have been developed in an attempt to dissipate the photopolymerization stress that may cause failure of otherwise properly placed posterior composite-resin restorations. The resulting shrinkage on polymerization consistently produced sensitive teeth after restoration with bis-GMA composites. The techniques used to fill posterior teeth that seem to reduce the shrinkage problem are the oblique incremental technique, the modified incremental technique,33 and the centripetal incremental insertion technique.34
Although newer composites have managed to reduce induced stress from photopolymerization shrinkage, the placement of a flowable liner such as glass ionomer, the use of an incremental restorative material placement technique, and careful use of the curing light are protocols that, when used properly, can ensure a restoration free of sensitivity.
Finishing Posterior Composites
Unlike some earlier generations of resin-based composite restorations, nanohybrid composite restorations may be polished to a toothlike finish. The smaller filler particle sizes seen in composite resin formulations allow a greater polishability.35 Care should be taken to create clean, smooth surfaces on the composite resin that will allow for proper finishing techniques. Proper finishing and polishing techniques enhance the final esthetics and longevity of direct-placement composite resin restorations.36
Initial shaping and removal of any interference to occlusal and lateral excursive movements are best achieved using small, smooth round diamonds. This approach shapes the surrounding composite and leaves a smooth, easily polished surface. Most manufacturers produce simplified polishing kits that can be used to create an enamel-like finish on the surface of the direct-placement composite restoration. Using these polishing systems and following the manufacturer’s directions can produce a long-lasting finish that will enhance the beauty and longevity of posterior composite restorations.
Conclusion
The newest genration of nanohybrid composite restorative materials exhibits a high esthetic value along with physical properties that mimic natural tooth enamel. These materials exhibit low thermal conductivity and expansion, they have high compressive strength, and they resist wear. They exhibit a high degree of biocompatibility and they are easy to place and sculpt and finish.
Using the recommended cavity preparation technique and the described placement protocol, direct-composite restorations of posterior teeth can be placed quickly and predictably and provide the patient with a long-lasting, esthetically pleasing restoration.
References
1. Christiansen G. Amalgam vs. composite resin: 1998. J Am Dent Assoc. 1998;129:1757-1759.
2. Kawai K, Hayashi M, Torii M, Tsuchitani Y. Marginal adaptability and fit of ceramic milled inlays. J Am Dent Assoc. 1995;126(10):1414-1419.
3. Tay FR, Gwinnett AJ, et al. Structural evidence of a sealed tissue interface with a total-etch wet-bonding technique in vivo. J Dent Res. 1994;73(3):629-636.
4. Mazer RB, et al. Evaluating a microfill composite resin. J Am Dent Assoc. 1992;123(4):32-38.
5. Ibsen R, Glace W. Microfilled Dental Composite and Method of Using Same. United States Patent 4297266. Filing Date 02/08/1980.
6. Christiansen G. Sorting out the confusing array of resin-based composites in dentistry. J Am Dent Assoc. 1999;130:275-277.
7. Stockton L. Vital pulp capping: a worthwhile procedure. J Can Dent Assoc. 1999;65:328-331.
8. Ferracane JL. Current trends in dental composites. Clin Rev Oral Biol Med. 1996;6(4):302-318.
9. Radz G. Enhancing smiles using microhybrid composite systems. Dent Today. 2003;22(9):54-59.
10. LeBlanc B. Nanohybrid composite restorations: dentistry’s most versatile solution. Dental Economics. 2009;99(5). Available at: www.dentaleconomics.com/index/display/article-display/363094/articles/dental-economics/volume-99/issue-5/features/nanohybrid-composite-restorations-dentistry39s-most-versatile-solution.html. Accessed May 25, 2010.
11. Lowe R. Combining technologies to improve esthetics. Dent Today. 2010;29(4):118-123.
12. Baseren M. Surface roughness of nanofill and nanohybrid composite resin and ormocer-based tooth-colored restorative materials after several finishing and polishing procedures. J Biomater Appl. 2004;19(2):121-134.
13. Bowen RL. Composite and sealant resins—past, present and future. American Academy of Pediatric Dentistry. 1982;4(10):10-15.
14. Burgess J, et al. Comparative properties of low-shrinkage composite resins. Compend Contin Educ Dent. 2010;31(Special Issue 2):10-15.
15. Deliperi S, Bardwell DN. An alternative method to reduce polymerization shrinkage in direct posterior composite restorations. J Am Dent Assoc. 2002;133(10):1387-1398.
16. Dewaele M, et al. Volume contraction in photocured dental resins: the shrinkage–conversion relationship revisited. European Cells and Materials. 2005;10(4):66-67.
17. Ritter AV, et al. Treating cervical dentin hypersensitivity with fluoride varnish. J Am Dent Assoc. 2006;137(7):1013-1020.
18. Terry D, Leinfelder K, Blatz MB. A comparison of advanced resin monomer technologies. Dent Today. 2009;28(7):122-123.
19. Schneider LFJ, Cavalcante LM, Silikas N. Shrinkage stresses generated during resin-composite applications: A review. J Dent Biomechanics. 2010. Available at: http://www.sage-hindawi.com/journals/jdb/2010/131630.html. Accessed May 25, 2010.
20. Lu Hui, et al. Dental resins based on dimer acid dimethacrylates: a route to high conversion with low polymerization shrinkage. Compend Contin Educ Dent. 2010;31(Special Issue 2):1-4.
21. Antonucci JM, et al. Polymerization shrinkage and stress development in amorphous calcium phosphate/urethane dimethacrylate polymeric composites. J Composite Mater. 2010;44(3):355-367.
22. Roberson T, Haymann H, Swift E. Sturdevant’s Art and Science of Operative Dentistry. 2002, St. Louis, Missouri; Mosby. 218.
23. Pace S. Rubber dam placement made easy. Contemporary Dental Assisting. 2006;28-29.
24. Murdoch-Kinch CA, McLean ME. Minimally invasive dentistry. J Am Dent Assoc. 2003;134(1):87-95.
25. Perdigao J, Geraldeli S, Hodges J. Total-etch versus self-etch adhesive, effect on postoperative sensitivity. J Am Dent Assoc. 2003;134(12):1621-1629.
26. Christensen G. Making Class II composite restorations predictable and profitable. J Am Dent Assoc. 2010;141(4):457-460.
27. Starrett DC, et al. Panel Discussion: Dentists, Educators Discuss Restorative Materials and Clinical Considerations. ADA Professional Product Review. Spring 2010;13-16.
28. Ramsey C. Posterior Restorations: Achieving Predictability with Cutting-Edge Adhesives and Composites. Learning Source: Mastering Dental Techniques. Web CE Learn HealthSci. 2010. Available at: http://kerrlearningsource.com. Accessed May 24, 2010.
29. Kurtzman GM. Improving proximal contours for direct resin restorations. Dent Today. 2010;29(4):106-109.
30. Miller M. Resin/glass ionomers. Reality. 2004;18:853-857.
31. Lowe R. The search for a low-shrinkage direct composite. Inside Dentistry. 2010;6(4):78-82.
32. Pfeifer CS, Ferracane JL, Sakaguchi RL, Braga RR. Factors affecting photopolymerization stress in dental composites. J Dent Res. 2008;87(11):1043-1047.
33. Lu H, Stansbury JW, Bowman CN. Impact of curing protocols on conversion and shrinkage stress. J Dent Res. 2005;84(9):822-826.
34. Monteiro PM, Manso MC, Gavinha S, Melo P. Two-year clinical evaluation of packable and nanostructured resin-based composites placed with two techniques. J Am Dent Assoc. 2010;141(3):319-329.
35. Duarte Jr S, et al. Marginal adaptation of Class 2 restorations. Quintessence. 2008;39(5):413-419.
36. RuTu G. Surface roughness of new microhybrid resin-based composites. J Am Dent Assoc. 2005;136(8):1106-1112.
About the Author
Harry A. Long, DDS, Private Practice, General Dentist, Wayne, New Jersey; Clinical Instructor, Aesthetic Advantage, New York University School of Dentistry, New York, New York